Mind Dump Calendar
Introduction
In our busy lives, juggling diary events like meetings and appointments can be chaotic. These events are often stored in online calendars—frequently shared with partners or colleagues who might disrupt your day by adding new events at any time—while your to-dos remain siloed in separate task lists. The Mind Dump thought process recognises that a task isn't truly scheduled until it hits your diary. Without structure, you might know you have 15 tasks to complete this week but lack a clear way to slot them into a sudden free couple of hours in the afternoon.
The Mind Dump calendar view is designed specifically to bridge the gap between your daily calendar and your task list. Here is how the system achieves this goal:
-
Seamless Calendar Integration: The calendar view connects directly to your online calendars using ICS and CALDAV formats. This pulls your events directly into the app, giving you your daily appointment structures exactly where you need to see them. Imported external events are clearly marked and maintained as read-only blocks, allowing you to easily plan around your busy schedule.
-
Side-by-Side Task Grouping: Next to your schedule, the right side of the interface provides a scrollable sidebar containing your full task list. These tasks are grouped exactly as they are in other areas of the app, using collapsable buckets like "Overdue", "Due today", "This week", "Later", and "Scheduled Tasks".
-
Drag-and-Drop Scheduling: Scheduling is as easy as dragging tasks from the sidebar into place on your calendar. The interface provides visual highlights and a "ghost" element as you drag, allowing you to drop tasks directly into hourly slots. This helps you actively build your tasks around your appointments, giving you a bird's eye view of everything you need to achieve today.
-
Direct Task Management: You never have to leave the calendar view to access or update task information. Every task card gives you direct access to details, meta badges, and tags. Through the edit modal, you can update properties, change time estimates, or add notes. You can also complete tasks right from the calendar using dedicated completion buttons; once finished, the system visually crosses them out so you can see your progress at a glance.
Navigating the Main Calendar Page: The Day View
When you open the calendar feature, the interface defaults to the Day View, which acts as your central command hub for daily planning. The screen is designed with a clear, split-screen layout: your daily schedule on the left and your unscheduled tasks on the right.
The Calendar Navigation Bar Running along the top of the screen is the calendar navigation bar, which provides all the controls you need to manage your calendar views and data.

-
Navigation Controls: Use the "< Prev", "Today", and "Next >" buttons to quickly jump between dates and find the day you want to plan.
-
View Switcher: While this guide focuses on the Day View, you can use the buttons on the far right to switch your perspective to a broader Week, Month, or Year view.
-
Date Display: A central display clearly shows the current date or month you are viewing.
-
App Actions: The "Back to Mind Dump" button returns you to the main app interface. The calendar automatically attempts to fetch your external diary events in the background when you open it, but limits this automatic syncing to once every 30 minutes to protect system performance. If you need an immediate refresh, clicking the "Fetch Calendars" button will manually force an override of this cooldown. There are also options to Print your day or week to a PDF if you prefer a physical copy.
Your Day Schedule (Left Side) The left half of the screen is dedicated to your actual daily schedule. This section features a vertically scrollable grid broken down into hourly slots.

To optimise your planning space, the calendar uses a dynamic height system for these hourly rows.
- Prominent Hours (Expanded Height): The most active parts of your day are displayed with expanded, taller cells, giving you plenty of room to arrange complex schedules and easily view your events.

-
Off-Peak Hours (Compact Height): Hours outside of your core day are compressed into compact, shorter rows to save valuable screen space and reduce the need for excessive scrolling.

-
Display Start Hour: To save you even more time, the calendar features an intelligent auto-scroll mechanism. When you load the Day View, the grid will naturally start at your designated "Display Start Hour," placing you exactly where your day begins rather than forcing you to manually scroll past midnight.
(Note: You can easily customize the exact start and end times for your expanded prominent hours, adjust the precise cell heights, and set your preferred default display start hour in the Settings -> User Preferences section.)
Throughout the day, your imported appointments and meetings are displayed as distinct blocks within these specific hourly rows. To keep you orientated, the app uses a special highlight and a "Now" indicator to visually mark the current hour of the day. External diary events that have been synced in will appear as read-only blocks with dashed borders, allowing you to clearly see where your existing commitments lie.
Task Grouping Sidebar (Right Side) The right half of the screen houses your task list in a dedicated, scrollable sidebar. To prevent your 15-plus tasks from looking like an overwhelming wall of text, the app intelligently sorts them into collapsable task buckets.
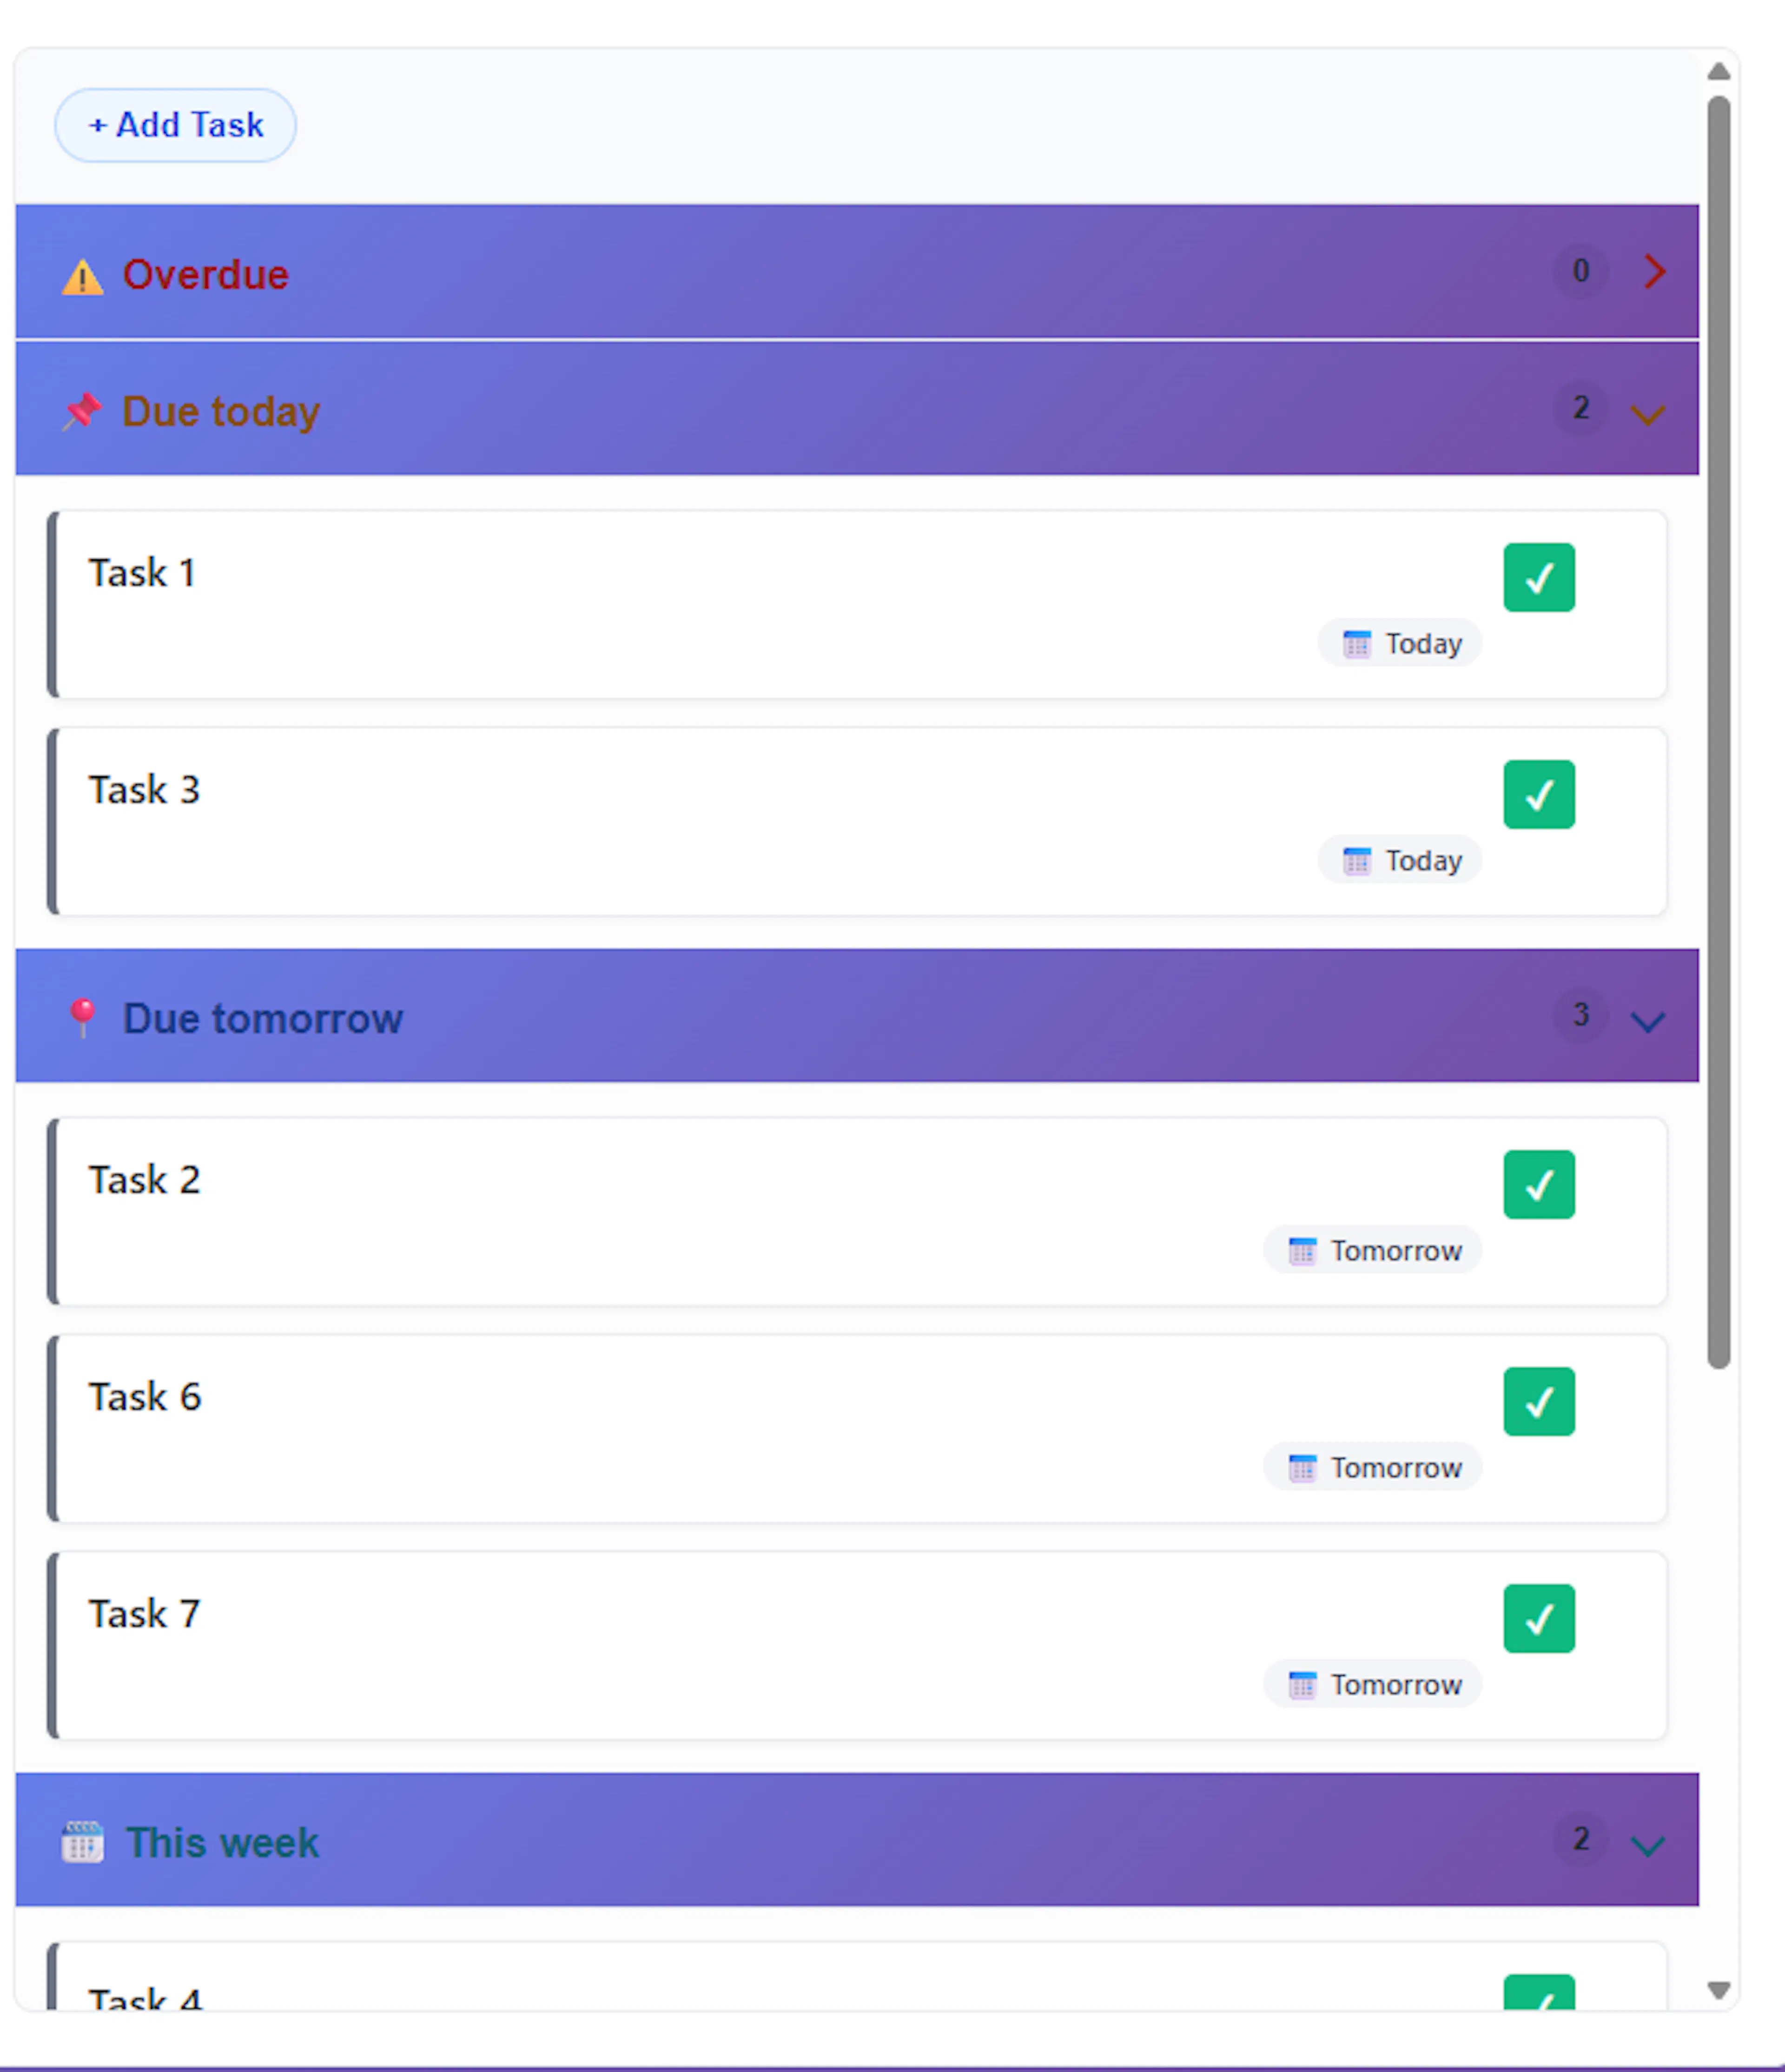
Intuitive Categories: Your tasks are automatically sorted into helpful groups based on their deadlines, including: Overdue, Due today, Due tomorrow, This week, This month, Later, No due date, and Scheduled Tasks.
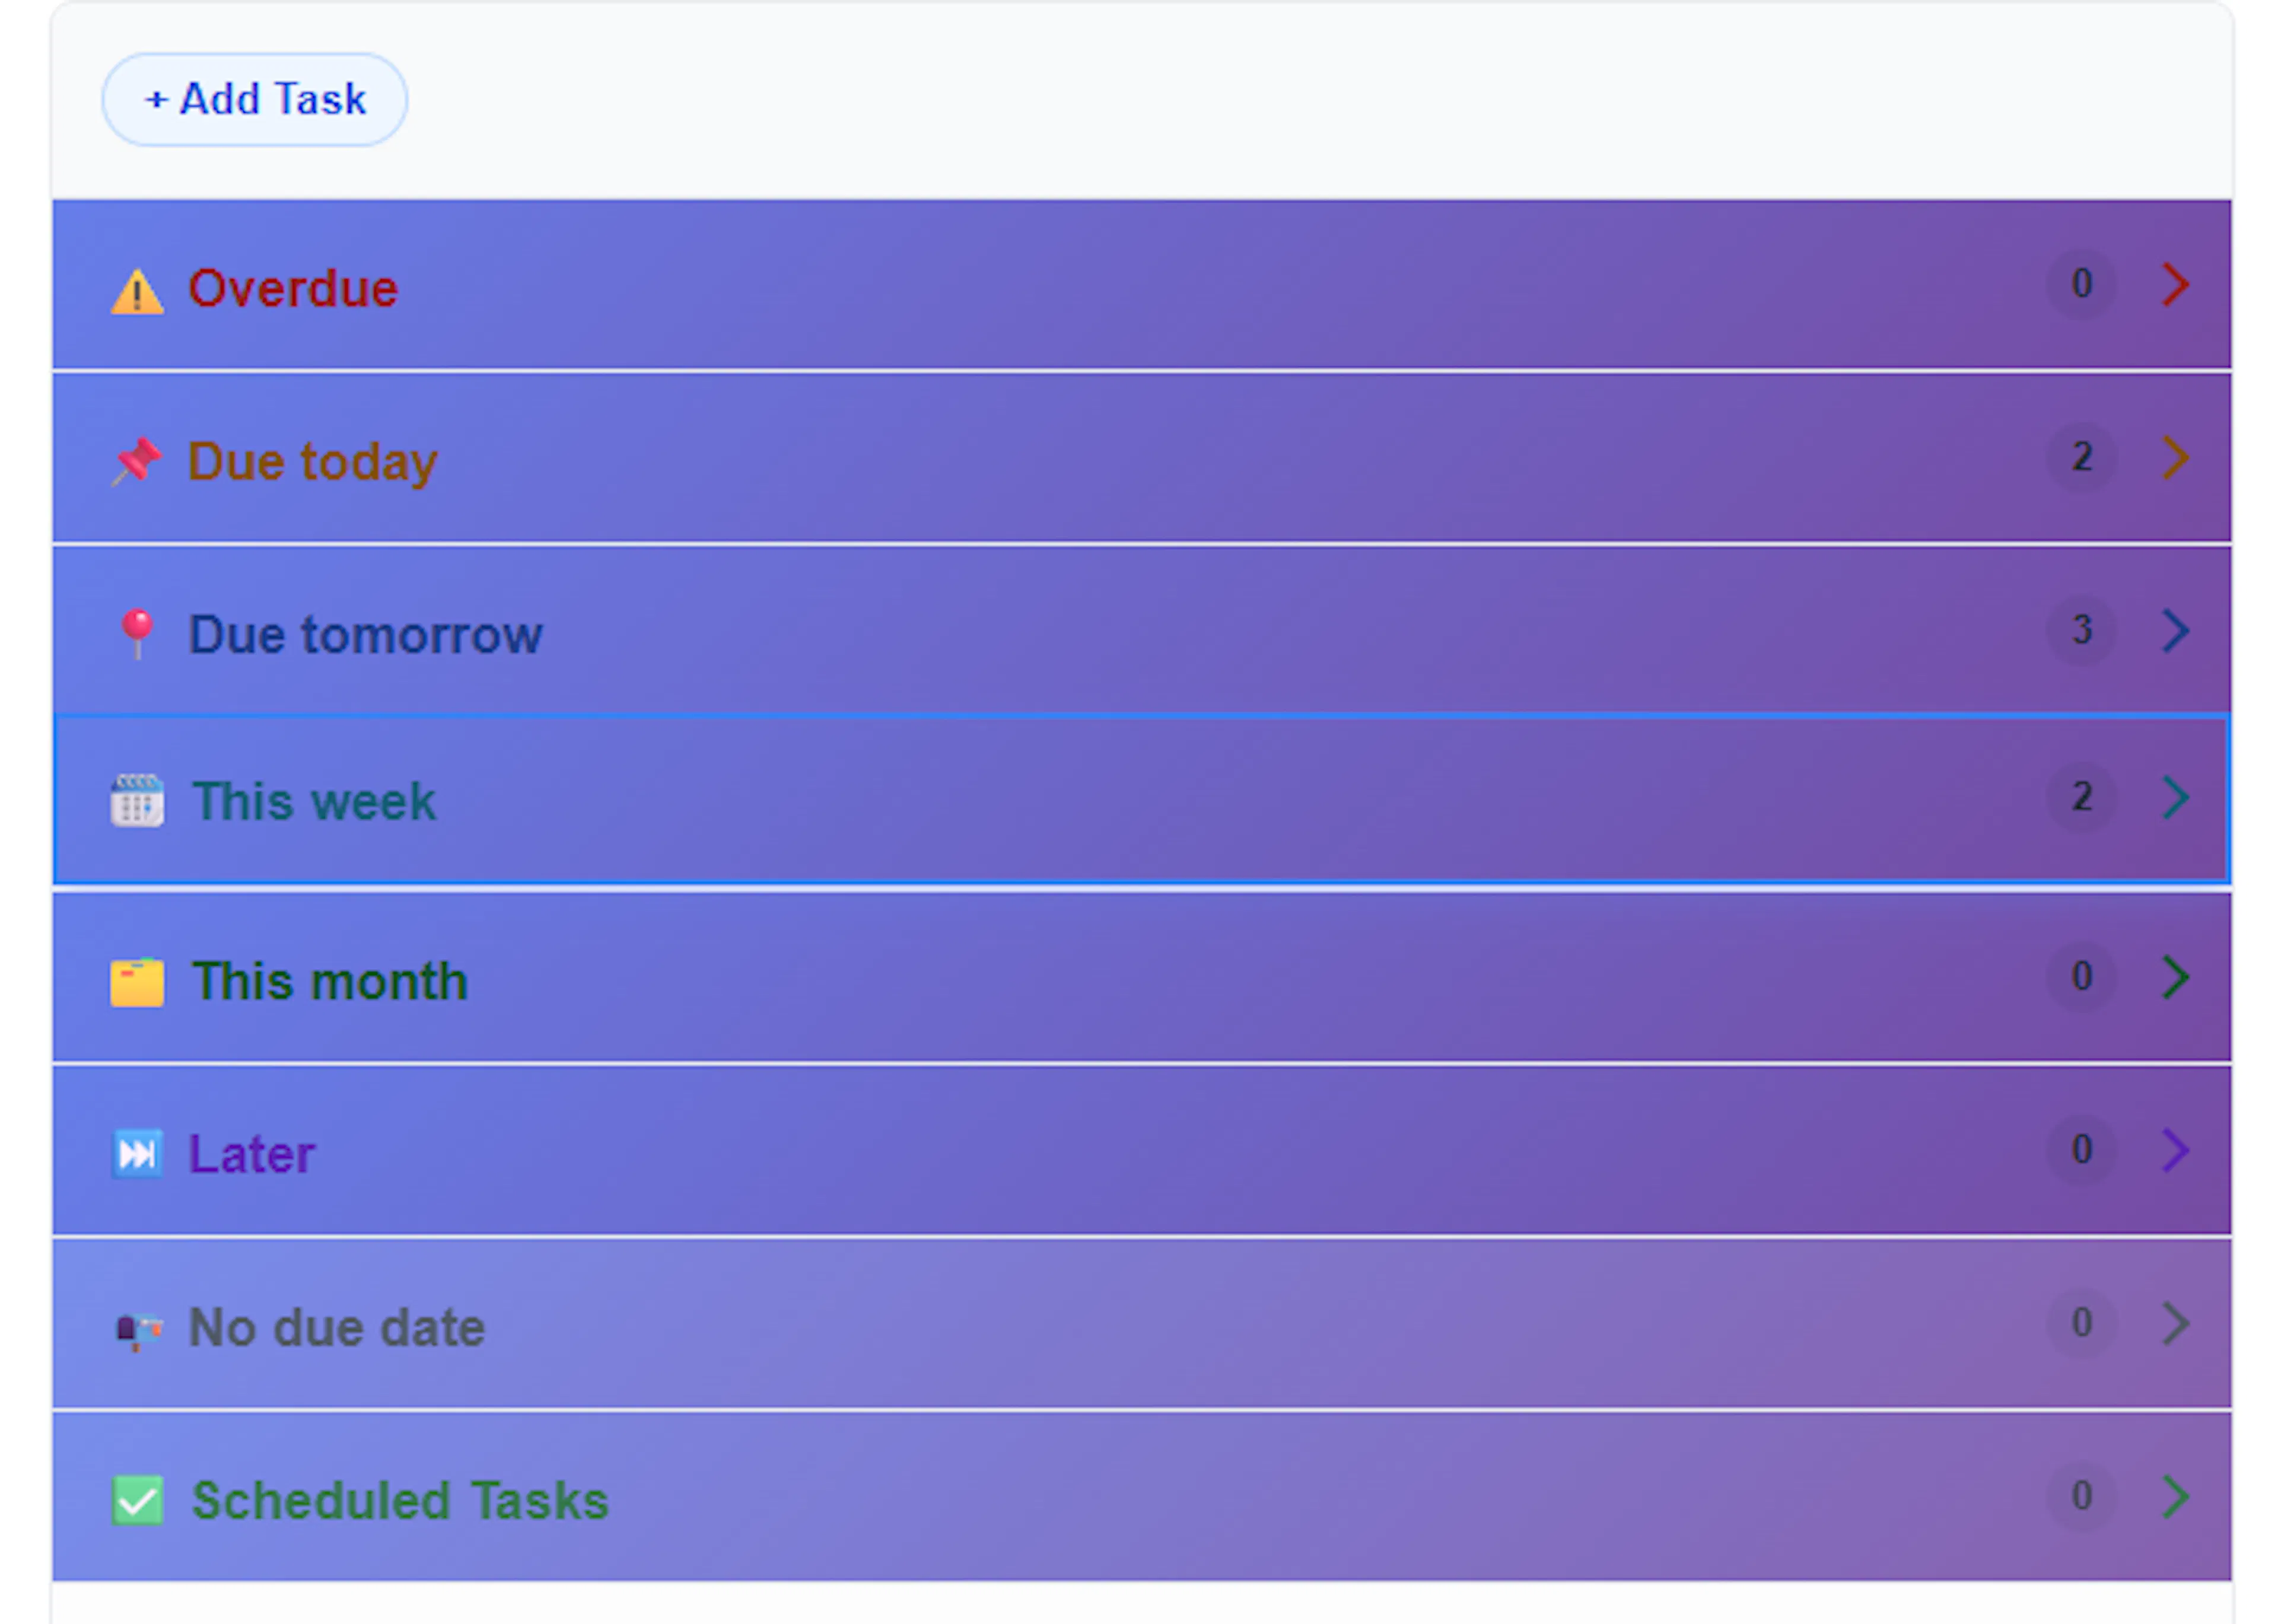
- Expand and Collapse Feature: To keep your workspace tidy, each of these groups functions as an accordion menu. The header for each group displays its name, an icon, and a count of how many tasks it contains. You can click the header to expand or collapse the list of tasks inside.
By keeping your structured day on the left and your organised task buckets on the right, Day View sets the perfect stage for building your schedule.
Zooming In: The Precision Hour View
While the main Day View gives you an excellent bird's-eye perspective of your schedule, sometimes you need to micromanage exactly when a task will happen. For this, the calendar app features a dedicated precision Hour View.
Here is how you can use the Hour View to fine-tune your day:
-
Accessing the Hour View: If you look at the daily schedule on the left half of your screen, you will notice that the times indicating each hour act as clickable links. Simply click on a specific hour to zoom into that time slot. A dedicated back button will appear at the top of the schedule to easily return you to the standard full-day view.
-
5-Minute Precision Intervals: Once activated, the interface expands the targeted hour, breaking it down into exact 5-minute intervals. This allows you to plan brief tasks, quick calls, or short breaks with ultimate precision.
-
The "Ghost" Context Window: To ensure you don't lose sight of what is happening right before or right after your focused hour, the view automatically displays a context window of 30 minutes before and 30 minutes after the selected time. These surrounding time slots are displayed in a slightly faded, "ghost" format to keep your attention on the primary hour while still maintaining visibility of your wider schedule.
-
Precision Drag-and-Drop Scheduling: Just like in the main Day View, you can drag tasks from your right-hand sidebar directly onto this precision window. As you hover over the expanded hour, a precision drop overlay and visual guides will appear, complete with markers to help you snap your task perfectly into place within those 5-minute increments. You will also see a visual "ghost" element following your cursor to provide immediate feedback on where the task will drop.
-
Dynamic Realigning: If you are dragging a task and realise you need to place it earlier or later than your currently focused hour, simply drag the task up or down into the faded 30-minute context areas. Doing so will dynamically shift and realign the Hour View to focus on the newly targeted hour.
-
Manual Hour Navigation: You can easily step forward or backward through your schedule without needing to exit the precision view. Simply click the previous (◀) or next (▶) arrow buttons located in the calendar's header bar to shift your focus to the adjacent hour. For even faster navigation, you can use your keyboard's arrow keys—press the Up or Left arrow to move back an hour, and the Down or Right arrow to move ahead.
This combination of micro-scheduling and fluid navigation ensures that even your busiest, most tightly packed hours can be structured effortlessly.
Broadening Your Horizon: The Week and Month Views
While the Day View is perfect for daily micro-management, planning ahead requires a wider perspective. Using the View Switcher buttons on the top right of the calendar navigation bar, you can easily shift your perspective to the Week or Month views.
The Week View The Week View provides a clear 7-day column layout. This view is ideal for reviewing your upcoming deadlines and balancing your workload across the immediate week.
The Month View The Month View displays a traditional calendar grid, complete with a handy week number column on the far left side. To ensure the calendar remains tidy and visually manageable, each day cell has a restricted height.
-
Handling Busy Days: If a single day is packed with more appointments or tasks than can fit in the cell, the app neatly hides the excess and displays a "more" button.
-
The Overflow Popover: Clicking this "more" button opens an interactive popover window that lists all the hidden events for that specific day. This ensures your screen stays uncluttered without losing access to your full schedule.
Interacting with Tasks and Events Even when zoomed out, your schedule remains fully interactive.
-
Visual Cues: Your events and tasks appear as coloured blocks within the day cells. External events imported from your synced calendars are easily identifiable by their dashed borders.
-
Click to View: You can hover over any event to highlight it and click directly on an event block to access its information.
-
Tracking Progress: As you complete tasks, they instantly update on the calendar. Completed tasks turn grey with a visual line-through, allowing you to see exactly what you have accomplished at a glance.
-
Free Events: Non-busy "Free" events are styled distinctively with a lighter, italicised appearance to differentiate them from your hard commitments.
Jumping to a Specific Date The calendar is designed to let you fluidly move between high-level planning and daily execution. In both the Week and Month views, you will notice that the header of every day cell acts as a clickable link.
The header highlights the date at the top of a cell to show that it is active when you hover over it. By clicking directly on this cell header, the calendar will instantly bypass the broader view and jump you straight into the detailed Day View for that exact date. This makes it incredibly easy to spot an open day in your monthly calendar and immediately dive in to start dragging and dropping tasks into its hourly slots.
The Year View: Your High-Level Navigation Hub
Accessed via the View Switcher buttons at the top of your screen, the Year View gives you an ultimate bird’s-eye perspective of your schedule. Instead of a continuous scrolling list, the calendar displays the year as a neat grid of 12 "mini-months".
What the Dots Mean: As you look at the dates within the mini-months, you will notice that certain days feature small red dots or "mini-event-indicators". These visual cues serve as quick alerts to let you know that a specific date contains scheduled diary events or tasks. This allows you to spot your busiest days or find completely free gaps in your schedule without having to open every single week.
Navigating to Months, Weeks, and Days: The Year View isn't just for looking at dates; it is fully interactive and acts as a drill-down menu, allowing you to instantly jump to any level of detail you need:
-
Jumping to a Month: At the top of each mini-month block is a clickable header displaying the month's name. Clicking this header will immediately switch your screen to the full, expanded Month View for that specific month.
-
Jumping to a Week: Down the left side of every mini-month grid, you will see a column of tiny numbers. These are the calendar week numbers. Hovering over them highlights them as clickable links; clicking a week number will instantly drop you into the 7-day Week View for that specific week.
-
Jumping to a Day: Every individual day number within the Year View is a clickable button. If you see a day with a red event dot, or just know you need to plan a specific date, simply click that exact day. The app will bypass the month and week views entirely, dropping you straight into your hourly Day View so you can immediately begin dragging and dropping tasks.
Understanding Your Calendar Items: An Introduction
As you start building your schedule, it is important to understand the different types of items you will see and interact with on your calendar. To keep your workflow clear, Mind Dump categorizes these items into four distinct types. We will cover each of these in detail later, but here's a brief overview of what they are and how they differ:
-
Tasks: These are your core actionable items managed within the main Mind Dump database. You might create these in various areas of the app. In the calendar feature, these unscheduled Tasks are listed in the dedicated task sidebar on the right-hand side of your screen whenever you are using the Day or Hour views.
-
Calendar Tasks: A standard Task transforms into a Calendar Task the moment it is scheduled. This happens when you drag a Task from your right-hand sidebar and drop it onto a specific time slot on your calendar grid.
-
Calendar Events: These are records that you manually add directly to the calendar interface. Calendar Events are not managed within the Mind Dump task database and offer more limited functionality compared to Tasks. However, they are highly useful for quickly blocking out time or adding simple diary entries that don't need to be tracked as project tasks.
-
Imported Calendar Events: These are external diary entries pulled into Mind Dump from outside providers, such as Google Calendar, iCloud Calendar, and Microsoft Live Calendar. These are set up in your system settings and connect to the app using ICS calendar streams, ensuring your external appointments are visible as read-only blocks alongside your Mind Dump workflow.
Working with Tasks in the Calendar View
Now that you understand the layout of the calendar, let's explore how to manage and schedule your Mind Dump tasks.
Recap: Tasks and the Sidebar Groups As a quick recap, Tasks are your core actionable items created and managed within the main Mind Dump database. When you are in the Day or Hour views, all tasks belonging to your currently selected session are displayed in the right-hand sidebar. To keep your workflow organised, these tasks are sorted into specific date groups, or "buckets".
Each group is initially collapsed to save space, but you can click the header to expand it and reveal the tasks inside. The available buckets are:
-
Overdue: Tasks that have missed their assigned task due date.
-
Due Today: Tasks specifically due on the current day.
-
Due Tomorrow: Tasks due the following day.
-
This Week: Tasks due within the current week.
-
This Month: Tasks due within the current month.
-
Later: Tasks scheduled further out.
-
No Due Date: Tasks that have not been assigned a deadline.
-
Scheduled Tasks: Tasks that have already been placed onto your calendar.
Task View, Editing, and Quick Completion You can interact with any task directly from the sidebar.
-
Task View/Edit Screen: Clicking a task card on the right will open the comprehensive Task View/Edit modal. Here, you can edit any facet of the task, including its priority, time estimates, notes, and custom fields.
-
Quick Completion: You don't need to open the edit screen just to cross something off. Every task card in the sidebar features a dedicated completion button. You can mark the task as complete right from inside the calendar view, which will instantly visually cross it out and fade the card.
Visual Cues and Badges: To help you understand your workload at a glance, task cards in the sidebar and events on the calendar grid feature rich visual indicators.
-
Urgency: Urgent tasks feature a red border and a fire icon (🔥), while non-urgent tasks feature a green border.
-
Time & Notes: Badges indicate if a task has notes attached (📝) and display estimated completion times (⏱).
-
Schedule Status: Tasks display badges for their due date (📅) and next scheduled time (🗓). If a scheduled time has passed without completion, a "Missed Schedule" alert (⏰) will dynamically appear.
-
Cross-Session Links: Events generated from tasks belonging to a different session feature a specific link icon (🔗) to warn you that task actions are restricted.
-
Completed Tasks: Completed items turn grey, feature a strikethrough, and display a "Task Completed" badge (✅).
Dragging Tasks onto the Calendar and Between Buckets When you are ready to plan your day, simply click and drag a task from the sidebar onto the calendar grid. As you drag the task over the hourly slots, the view dynamically changes to allow for a 5-minute position resolution. An overlay appears with precision guides and a marker, allowing you to snap the task perfectly into exact 5-minute increments within the hour.
Updating Due Dates: You can also change a task's due date by dragging it from one sidebar bucket to another. If you drop a task into a broad bucket like "This week" or "Later," a modal will appear offering a suggested due date or allowing you to manually pick a specific date to apply.
Unscheduling Tasks: If you need to remove a task from your calendar, simply drag the event block from the calendar grid back into the task sidebar. The system will prompt you to confirm the removal, which will delete the calendar event and return the task to your active task list.
Managing Clashes and Adjusting Events
-
Column Formatting: If you schedule multiple tasks at the same time, the calendar intelligently arranges these task events into side-by-side columns. This prevents visual task clashes and ensures that every scheduled event remains visible and readable.
-
Dragging on the Calendar: Once a task is placed on the calendar, it isn't locked in place. You can drag the event to a new time slot or use the resize handles at the bottom of the event block to quickly extend or shorten its duration. A live label will appear as you resize, giving you real-time feedback on the new time.
The Lifecycle of a Scheduled Task When you drop a task onto the calendar, it automatically moves from its original date bucket into the "Scheduled Tasks" group in your sidebar.
However, Mind Dump is designed to keep you accountable. If the scheduled end date of the calendar event passes and the task has not been marked as completed, the system will automatically remove it from the Scheduled Tasks group and return it to the relevant incomplete bucket (such as "Overdue"), ensuring nothing falls through the cracks.
Task Events vs. Calendar Events When looking at your calendar grid, you can easily tell which events are tied to your Mind Dump tasks. Event tasks are visually flagged with a distinct task badge (a small chip icon) so you can differentiate them from imported diary appointments or manual calendar entries.
The Task Event Dialog If you click on a scheduled task event on the calendar grid, a specific dialogue window opens to manage that instance. This dialogue features several controls:
-
Action Buttons: You will find buttons to Delete Event (highlighted in red and pushed to the left to prevent accidental clicks), Duplicate the event, Complete Task, Open Task (which opens the full Mind Dump task editor), Cancel, and Save.
-
Editing Titles and Dates: You can manually change the title and the start/end dates directly in this dialogue. Crucially, these changes apply only to the calendar event instance, not the actual Mind Dump task. This allows you to rename an event to something like "Prep for Meeting" without altering the master task name in your database.
-
Mark as Busy Time: You will also see an option to mark the event as "Busy Time." By default, tasks can be visually set to "free" (which styles them with a lighter, italicised appearance), but marking them as busy ensures that this block of time is treated as a hard commitment on your schedule, helping you protect your time.
Calendar Keyboard Shortcuts
The Mind Dump Calendar includes several keyboard shortcuts to help you quickly navigate between different views and manage your schedule.
Important Note: To prevent accidental navigation while typing, all calendar shortcuts are automatically disabled if you have a modal open (such as the Edit Task modal) or if your cursor is currently active inside a text input, text area, or dropdown menu.
View Switching Shortcuts You can rapidly switch between different calendar perspectives using the Alt key (or Option key on a Mac) combined with a letter.
-
Alt + D: Switch to the Day view.
-
Alt + W: Switch to the Week view.
-
Alt + M: Switch to the Month view.
-
Alt + Y: Switch to the Year view.
-
Alt + H: Toggle the Hour Focus view on and off. Note: This shortcut only works if you are already in the Day view.
Hour Focus Navigation When you have the Hour Focus view enabled, you can use your keyboard's arrow keys to quickly shift your schedule forward or backward.
-
Up Arrow (↑) or Left Arrow (←): Shift the focus window to the previous hour.
-
Down Arrow (↓) or Right Arrow (→): Shift the focus window to the next hour.
General Shortcuts
-
Alt + F (or Option + F): Quickly focuses the calendar search bar so you can immediately begin typing your search criteria.
-
Escape (Esc): The Escape key can be used to quickly close the "month overflow" popover (which appears when you click to view additional hidden events on a single day in the Month view). It can also be used to cancel out of the "Set due date" bucket modal or cancel out of editing a task name in the simple modal.
Adding a New Task from the Calendar
While organising your schedule, you might realise you need to create a new action item. You can do this entirely without leaving the calendar interface.
-
The Add Task Button: Located at the top of the scrollable Task Grouping Sidebar on the right side of the screen, you will find a dedicated "+ Add Task" button.
-
Smart Date Pre-filling: Clicking this button opens the standard task creation modal over your calendar. To streamline your workflow and save you time, the calendar intelligently pre-fills the new task's "Due Date" to perfectly match the specific date you are currently viewing on the calendar.
-
Instant Updates: Once you finish creating the task and hit save, the calendar automatically fetches the latest data and refreshes the view. Your newly created task will instantly appear in the appropriate task bucket (such as "Due today" or "Due tomorrow") in your sidebar, ready for you to drag and drop into your daily schedule.
Searching Your Calendar
Finding specific events—whether they are coming up next week or happened months ago—is quick and intuitive using the calendar's built-in search functionality. The search feature is comprehensive, pulling matched results from both future and historical events.
Here is how to use the calendar search:
Using the Search Box: To begin, press Alt + F (or Option + F on Mac) to quickly focus your cursor, or manually click the search entry box, and start typing your search criteria. As you type 3 characters or more, your matching hits will dynamically appear in the dedicated results box displayed in the centre of the screen.
-
Understanding Your Results: To help you identify the right event at a glance, each search match includes three key pieces of information:
-
The Event Name
-
The Date of the event
-
The Type of Calendar Entry (clearly categorised as a Task Event, a standard Calendar Event, or a synced External Calendar event).
-
-
Jumping to an Event: Once you find the event you are looking for, its name acts as a clickable link. Simply click the event name to immediately jump your calendar view right to the specific date of that event.
Recurring Calendar Events
Managing Recurring Events and Tasks
While navigating your calendar, you will often encounter items that repeat on a regular basis. Mind Dump handles repeating items by distinguishing between Recurring Calendar Events and Recurring Tasks.
Understanding the difference is important:
-
Recurring Calendar Events are simple calendar blocks that happen over and over again without requiring specific preparation (for example, a reminder to put the dustbin out for collection).
-
Recurring Tasks are actionable items that you need to actively work on, prepare for, or report on.
Creating a Recurring Calendar Event
You can turn any standard calendar event (created directly by clicking on the calendar, not imported or linked to a task) into a recurring event.
When creating or editing an event, simply check the "Repeat this event" option to reveal the recurrence settings. You will need to define:
-
Frequency: Choose whether the event repeats on a Daily, Weekly, Monthly, or Yearly basis.
-
Interval (Every): Use the interval count alongside the frequency to establish how much time passes between occurrences. For example, if you want an event to happen every fortnight, you would set the frequency to "Weekly" and the interval to "Every 2".
-
Weekdays: For weekly events, you can specifically check which days of the week the event should fall on (e.g., only Mondays and Wednesdays).
Setting the End Date and System Limits
You must also establish when the recurring series finishes by selecting one of three options: Never, On date, or After N times (a specific number of occurrences).
Important System Note: If you set the event to end "Never" or pick a finish date several years in the future, Mind Dump will not immediately generate thousands of events all at once (which would overwhelm the system). Instead, the calendar safely creates a maximum of 200 iterations upfront. As time passes and you proceed through your calendar, the system will automatically generate the next batch of future events to keep the series going.
Editing Recurring Events & Scope Rules
When you click to edit an existing recurring calendar event, you must tell the system how broadly you want to apply your changes. Mind Dump uses specific rules to ensure your edits do not accidentally overwrite manual exceptions you have already made to the schedule.
You will be prompted to choose one of three scopes:
-
This event only: This applies your edits (such as changing the name, time, or deleting it) strictly to the current instance you clicked on. Making this change breaks this specific event out of the automated sequence.
-
This and future events: This alters the current instance and every occurrence scheduled after it. Crucial Rule: This will not change the details of any future events that have already been broken out of the sequence. For example, if you previously moved next month's meeting to accommodate a client, and then decide to shift the entire series an hour earlier, your custom client meeting will be preserved and will not be overwritten by the series update.
-
Entire series: This applies the changes to every instance of the event, both past and future. Just like the rule above, future instances that you have manually edited outside of the sequence are protected and will not be impacted.
Resolving Overdue Recurring Tasks
Because Recurring Tasks require actual completion, the system treats them slightly differently than simple calendar events if you fall behind. If you attempt to complete a recurring task where the scheduled date is already in the past, the system will prompt you with a "Resolve Overdue Recurring Task" modal.
To get your sequence back on track, you will be asked to manually confirm two dates:
-
Immediate next task: The specific date you want the immediate next task to be scheduled for (usually defaulting to today).
-
Following task (Anchor Date): The date from which all future recurring iterations should follow.